How to Make a React Native Background Countdown Timer (2021 with Hooks)
-30 January 2021
Intro
In this tutorial we will be creating a countdown timer that can run in the background e.g. if you start the timer, then go onto the Facebook app, the timer will continue to countdown. The code in this tutorial should work on both Android and IOS 👌
I also made a video tutorial to make your lives easier!
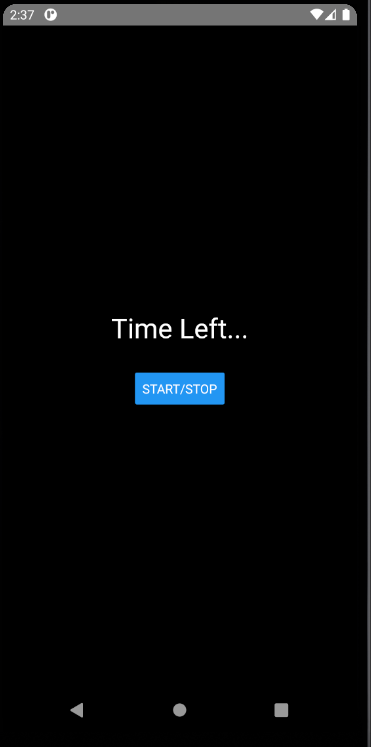
This is what our app will look like. I kept styling super minimal to better focus on functionality.
1. Setting Up Our Project
First we need to initialise our react native project, install the background timer package, and then run the project on an android or ios emulator.
npx react-native init yourProjectNameHerenpm install react-native-background-timer --savenpx react-native run-android
2. Coding the Layout
Now clear everything out of the App.js file and add in the code below.
We can import everything we need for this project at the top. We will then return a <View> container with a nested <Text> component where we will later display the time left. Below that we have a <Button> that will be used to start and stop the timer.
Then add some super simple styles at the bottom of the file to centre, colour, position and size everything.
// App.jsimport React, { useEffect, useState } from "react"import { View, Text, StyleSheet, Button } from "react-native"import BackgroundTimer from "react-native-background-timer"const App = () => { return ( <View style={styles.container}> <Text style={styles.time}>Time Left...</Text> <Button title="Start/Stop" /> </View> )}const styles = StyleSheet.create({ container: { alignItems: "center", justifyContent: "center", flex: 1, backgroundColor: "#000", }, time: { fontSize: 30, color: "#fff", marginBottom: 30, textAlign: "center", },})export default AppHere's what we've got so far:
3. Adding State and a UseEffect Hook to Start/Stop the Timer
We can now add two state variables (all we will need) to the top of our functional App component. 3601 seconds corresponds to 01 hour : 00 mins : 01 sec. The state variable timerOn will be toggled on or off by the start/stop button.
Next add a useEffect hook which will run whenever the timerOn variable is changed. If timerOn is true, then we run the startTimer function which we’ll define in step 4. Otherwise, we stop the background timer.
When a function is returned from a useEffect, it basically means componentWillUnmount. This is the last function call before the component is removed and should be used to stop the timer from running.
const App = () => { const [secondsLeft, setSecondsLeft] = useState(3601); const [timerOn, setTimerOn] = useState(false); // Runs when timerOn value changes to start or stop timer useEffect(() => { if (timerOn) startTimer(); else BackgroundTimer.stopBackgroundTimer(); return () => { BackgroundTimer.stopBackgroundTimer(); }; }, [timerOn]);Now is a good time to add an onPress event listener to the button to toggle the timerOn boolean value.
<Button title="Start/Stop" onPress={() => setTimerOn(timerOn => !timerOn)} />4. Define startTimer function
The startTimer function, when called, starts the countdown. The runBackgroundTimer method works on both iOS and Android. This will be called every 1s (1000ms). If there are any seconds left, then we will minus 1. When seconds hits 0, we return 0 to ensure that we don’t go into negative time.
const startTimer = () => { BackgroundTimer.runBackgroundTimer(() => { setSecondsLeft(secs => { if (secs > 0) return secs - 1 else return 0 }) }, 1000)}Now we need to define another useEffect hook to handle when secondsLeft reaches 0 so the backgroundTimer can be stopped.
// Checks if secondsLeft = 0 and stop timer if souseEffect(() => { if (secondsLeft === 0) BackgroundTimer.stopBackgroundTimer()}, [secondsLeft])5. Format the Time
We could now just add the secondsLeft to be outputted in the <Text> element and be done with it, but we can do a little better.
Let’s add a clockify function to format secondsLeft into hours, mins and secs.
const clockify = () => { let hours = Math.floor(secondsLeft / 60 / 60) let mins = Math.floor((secondsLeft / 60) % 60) let seconds = Math.floor(secondsLeft % 60) let displayHours = hours < 10 ? `0${hours}` : hours let displayMins = mins < 10 ? `0${mins}` : mins let displaySecs = seconds < 10 ? `0${seconds}` : seconds return { displayHours, displayMins, displaySecs, }}Here is an example of how this works if we have 3601 seconds left:
First, we calculate the hours
Divide total seconds left by 60 to get it to mins and then again divide by 60 for hours.
- 3601 / 60 / 60 = 1.00027777778 hours.
- Math.floor(1.00027777778) = 1 hour.
For mins:
- 3601 / 60 = 60.0166666667 mins.
- But we only want the mins left over after calculating the hours, so 3601 / 60 % 60 = 0.0166666667 mins.
- Math.floor(0.0166666667) = 0 mins.
For secs:
- We only want the seconds left over after calculating the mins, so 3601 % 60 = 1.00027777778 secs (i.e., the seconds left over after dividing 3601 by 60)
- Math.floor(1.00027777778) = 1 sec
Result
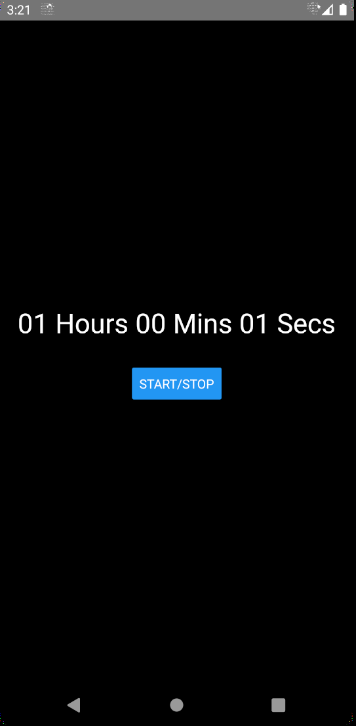
So 3601 secs = 1 Hour : 0 Mins : 1 Sec
To tidy things up, we can add displayHours, displayMins and displaySecs to ensure we always have two digits e.g. 05 mins, not 5 mins.
7. Rendering Out the Time
The clockify function returns an object, so we can access those hours, mins and secs values easily.
return ( <View style={styles.container}> <Text style={styles.time}> {clockify().displayHours} Hours {clockify().displayMins} Mins{" "} {clockify().displaySecs} Secs </Text> <Button title="Start/Stop" onPress={() => setTimerOn(timerOn => !timerOn)} /> </View>)That’s all folks. We have a countdown timer that runs in the background on both Android and iOS with the same code.
If you have any feedback then please leave me a comment. Feel free to check out my YouTube channel for more tutorials. Have a good day!


